How to Create a Custom Color Palette in PicMonkey


 This is a tutorial I’ve been meaning to do for quite some time, it’s a how to on creating a color palette in PicMonkey. It’s a great way to get a feel for color, as well as, drawing out those colors that sometimes get overlooked. This is a huge help when deciding on paint colors for a room, or finding the perfect contrast to elements within the space. Find a picture you love the colors of and lets begin. I’m going to assume you’re not familiar with PicMonkey in this tutorial (if you’ve got a feel for PicMonkey go ahead and use the drag and drop method for creating the collage).
 Step 1: Open PicMonkey (the free program) and choose the option COLLAGE. It will give you a drop down menu to choose your photo from your own computer. Pick the photo you will be creating the color palette for.
 Step 2: Your chosen photo will show up in the left hand side of the page. Click the photo and drag it onto the collage, adjust the photo panel to incorporate the whole picture or the portion you will be using (to do this grab the dotted lines and move the right, left, up or down until your collage looks similar to mine in size). You should now have 2 extra white frames with dotted lines around them on the right hand side.
 Step 3: Click on the X in the top right hand corner, this will give you one white frame (instead of the earlier 2).

Step 4: Now on to the fun stuff, at the top of the page click on EDIT, a box will open up asking you if you’re ready to send this collage to the Editor for text, and overlay and more. Click OPEN IN EDITOR.

Step 5: In the OVERLAYS Panel (the butterfly on the left will open this panel) now click GEOMETRIC and grab the black rectangle.
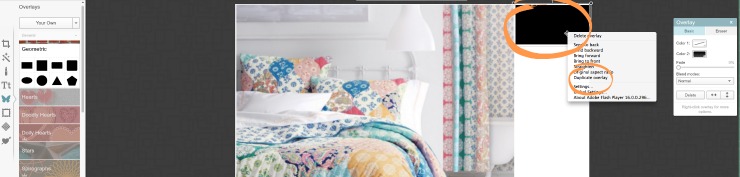
Step 6: You will drag the black rectangle over into the white frame on the right hand side. You can right click on the black rectangle and a box will pop up, in that box is the option to DUPLICATE THE OVERLAY you will do this until you have enough black rectangles to fill that white frame. Note: You many need to adjust the size of the rectangle to get an even fit so do that if need be.

Step 7: You should now have several black rectangles, and these rectangles will now become your color palette.

Step 8: Click on the first (top) rectangle, when you do this a white line will surround the rectangle letting you know you have it selected. Now on the right hand side of your page will pop up a color guide and in that guide is an eyedropper. Click on the eyedropper, carry it over to your photo and hover over the area you would like to pull color from, once you’ve found the right color click on it (with the eyedropper). The black box will automatically turn the color of the area the dropper is over. You’ve just created your first color in the palette section.

Step:9 Repeat step 8 until you have all your black rectangles selected with a color from your photo.
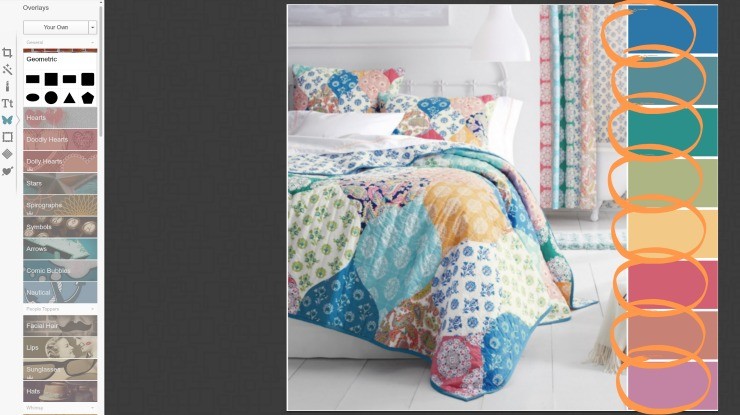
Step:10 It should now look like this.

Step:11 Once you’ve made all your selections and have your palette just the way you like it. Click on the SAVE button at the top.

Step:12 Name your project, select the dimension size, and save it to your computer. Don’t forget to watermark your image, and if you need a tutorial on how to CREATE A WATERMARK IN PICMONKEY Click here.
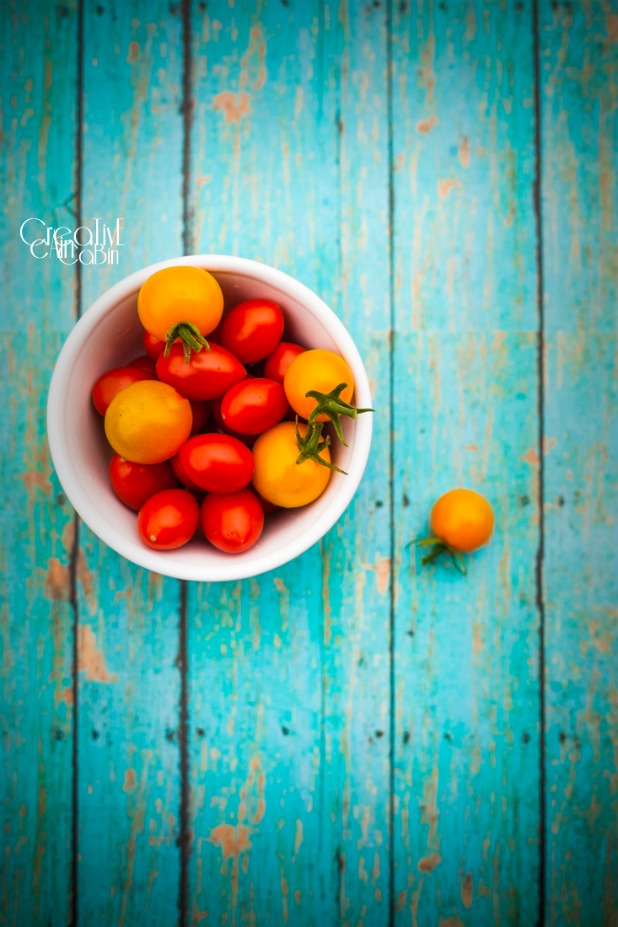
 {Photo Via Garnet Hill}
This is what your FINISHED PRODUCT will look like. If you have any questions or need some help just leave me a comment below and I’ll get right back to you.

Here’s another option for layout of your color palette. There’s no wrong way to do it, so get creative.


Oh, Dawndie! You’re so smart! I love this and can see how it would help to bring colors into a room so much! You really know your stuff! Have a beautiful Sunday.
Be a sweetie,
Shelia 😉
Shelia, it’s such a fun way to get inspiration with color you never thought of using.
This is a wonderful tutorial, Dawn. I love pic monkey but I never knew what the eyedropper was for. I better wait till later to try it or I’ll be on here all day having fun with it. Thanks so much!
JoAnne, the eyedropper is a great tool, give it a try.
Again, I’m amazed! Thank you for sharing. I’m pinning!
Amy, I love figuring out how to do things with this free program. Not everyone has the time to figure out Photoshop!
I’ve always wanted to do this for my colors but never took the time. Thanks for the inspiration and how to!
Ann, you now can do it 🙂
I love using PicMonkey , so I’m looking forward to trying this out. Thanks Dawn!
Diane, it’s such a great program for FREE. I normally use Lightroom but can always find a way to do it in PicMonkey and create a tutorial.
Amazing! Thanks for sharing your how to!
Judy
You’re welcome Judy:)
i am pretty well versed in Picmonkey, but I still enjoy learning more!
Carol, it’s an extensive program for free and I’m always finding ways to do things that can be done in photoshop.
Oh my goodness! You are a real pro! Thanks so much for sharing! ♥♥♥
Holly, Thanks for dropping in 🙂
Dawn, thanks for creating a tutorial on how to do this! Can’t wait to give it a try!
Jane, it’s fun to play with I bet you can find many uses for it.
How fun Dawn. WHat a great idea! I’ll be making these for sure!
Yvonne, they are fun to do, you can get so creative.
Great tutorial Dawn! I can’t wait to try this out!
Catherine, you will find it addictive, I did 🙂
Thanks Dawn for the tutorial. I’ve notice a number of these sorts of things on Pinterest, it never occurred to me it would be so easy to do … I can see a whole new Pinterest board in my future 😉 [like I don’t already have enough 😉 ]
Mignon, yes there are other programs out there that can do this but why not do it for free? It’s addictive by the way.
This is great Dawn! Thank you so much for the Picmonkey color palette tutorial.
Michelle you are welcome its a fun project to get creative with.
Now, this is something I never thought of doing and it is such a great idea. Thanks for the tutorial. I’m a huge PicMonkey fan and really love it.
Maureen
Maureen, it’s addictive so you are forewarned once you start you cant stop. LOL
Dawn, I spent hours today with Pic Monkey with your tutorials opened in separate windows [lol]. I could not get my watermarks to look as dark as yours. I tried using larger canvas sizes instead of the custom size in your tutorial. Any suggestions? Thank you !
Windi, are you using black as your color? Also if your font is thin it won’t look as dark. Let me know so I can continue to help you.
You never cease to amaze me, Dawn. Wonderful tutorial and absolutely gorgeous photos as always. Swooning (and pinning!).
Thanks for the pin Mary Beth, I love to find new ways to use PicMonkey.
Love this! I have been using Pic Monkey for quite awhile and never realized that this could be done.
Going to try this out right away-thanks!!
Sue, have fun….but be warned it is addictive. LOL