DIY Stamped Concrete Patio


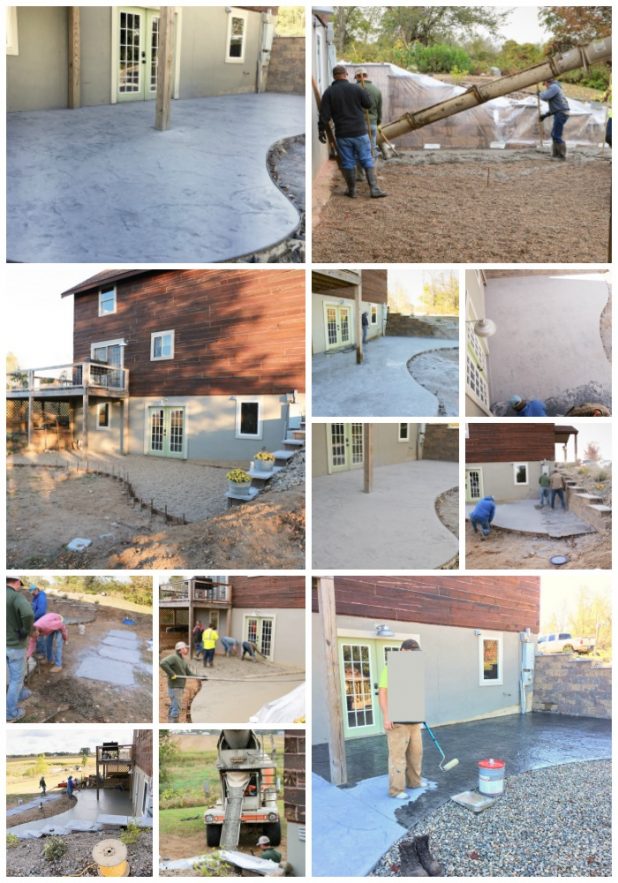
I’m back to show you more of what’s been going on in our backyard, and today its our DIY Stamped Concrete Patio. It’s a picture heavy post so creating a slideshow seems better than having you keep scrolling to see more shots. This has been a crazy few weeks we’ve been trying to accomplish all those must be done before winter projects. All summer long we’ve had zero rain and wouldn’t you know it right when we have the time to work we have scorching 90 degree temps making it to hot to pour concrete followed by day’s of on and off rain. Well between the heat and the rain drops hubby was able to finish the concrete pour and seal it.
[metaslider id=16441]
Rather than a rectangular concrete patio we wen’t with a radius, for a reason I’ll share in an upcoming post, and to level it all off hubby added peas stone to the ground under where the concrete will be. We also had to take out the french door and move it up to accommodate for the concrete thickness. Ya know no project is every easy it always seems more work is involved than our original plan. Apparently hubby knew the door had to come out but you know how I am about being a neat freak so that little detail threw me for a loop. All I could see was dust, concrete, and bugs coming in all over the basement floor, but it wasn’t as bad as I imagined.
Next our crew and the concrete truck arrived. Luckily because of the lack of rain our yard was not only dead, but rock hard so the concrete truck didn’t leave trenches getting to the back yard. That was a huge bonus and one less thing that would need to be fixed.
After the concrete was down, floated and edged next came the fun part; adding the releasing agent in gray and the stamping began. Those 4X4 rubber squares you see are the concrete stamps and it’s what gives it the texture we’re looking for. Since we didn’t go with stone work on the basement walls we felt giving the patio a little pizazz is what it needed. The stamp we used is called Fractured Earth and it gives it a texture that’s so much nicer than plain old concrete.

Once the concrete was hard hubby sprayed with just water all the release agent off and saw cut the concrete into sections (this has to be done to avoid cracking here in Michigan) then my job was to seal the concrete. It seems like I always get the boring jobs but back in the day I used to work pouring concrete and loved it. I’d rather do hard physical labor any day over office work, but I did my menial task and loved the results. I can’t believe how the texture really came alive by just sealing it.
Now our family is enjoying that space every weekend. If you happen to look closely in one of the photos you can see the excavator in the background where hubby is dredging our pond and making it bigger. The deer are around it every day for their morning drink, so I’m glad he’s keeping it maintained I love to watch all the wildlife enjoying it.
I’m fortunate hubby can do all the work we need done around the cabin and we own all the equipment which means we don’t have to pay for any of those things. We also have a stockpile of sand, topsoil, and blue clay from digging our pond and that comes in handy.

Don’t forget to check out our Toy Shed Build, Retainer Wall Build, Painting the Exterior Basement Wall posts. And there’s more going on in the back yard, so keep coming back to see what that is.


Love love love your new patio! It’s an extension of your basement….. like another room, and you have waited a long time for this! Thanks for sharing these photos.
Diane yes I’ve been waiting a long time. I’d given up on it and decided to just make do by painting the concrete wall the door and do a little landscaping. I’m so glad hubby jumped in and decided to finish my vision.
Oh, I love it!! You have the best ideas, Dawn. And I’m blown away that you used to work a job pouring concrete – WOW!!
Jen, yes I love to do physical labor but I’ve spent a lot of time at the chiropractor lately paying for all the hard work I’ve done over the years. It was so hard to let the men do the work, I so wanted to get in there and help.
Dawn, it’s all just so gorgeous. I’d love to see a close up of the texture on the concrete. You are going to enjoy that space so much.
Becky, I just went back and added a close up photo if you’d like to head over and check it out again.
Oh Dawn, I absolutely love the stamped concrete. Thx for the close up picture. My husband and I have been thinking about a stamped concrete patio. Yours looks amazing.
Becky I recommend it, it gives it a much better look than just plain finished concrete.
Wow ! What a transformation!! It looks awesome !! I need my husband to do that at my back door …hopefully your post will inspire him !!
Cheryl, I’ve found you have to get started and the men will join in, LOL
Patio looks awesome they did a great job. Its amazing how the colors really pop when you finally get to seal a stamped concrete patio or walkway.
Chris, yes the sealer made all the difference. I loved it naked but with the clear top coat it shows all the color variations. I’m very happy with it.