Make Your Own Peasant Top Pattern


Learn how to make your own pattern for this easy peasant blouse!
There are only 4 pieces to this pattern.
Front
Back
2 sleeves
To get started:
Choose an existing top out of your already owned selection, round up some freezer paper, newspaper, or anything you’re comfortable with using for making the pattern.
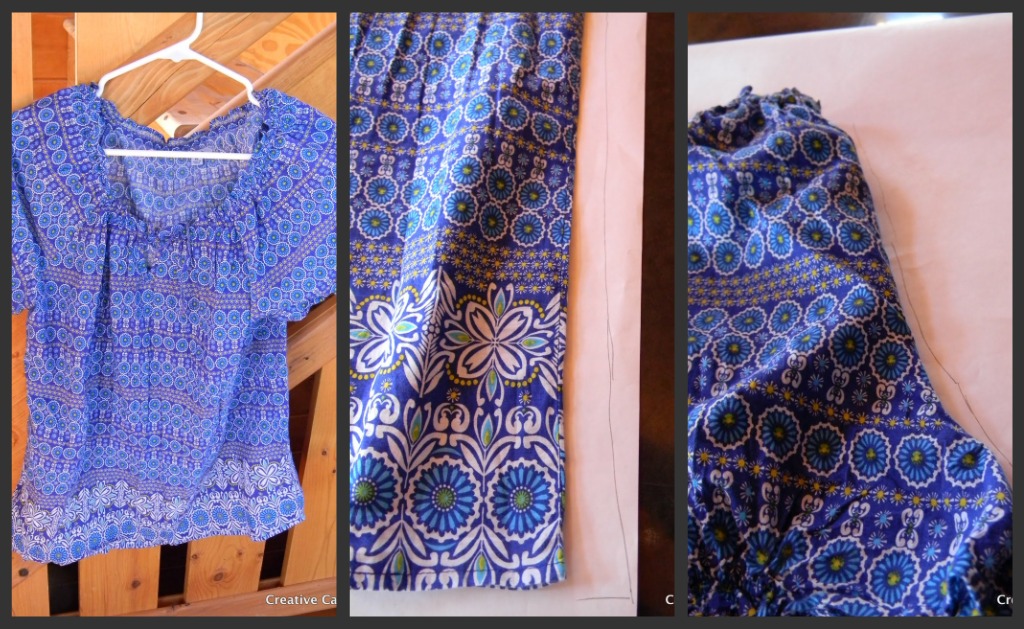
I placed the shirt on the freezer paper and traced from under the armpit, down the side and half way across the bottom. (Don’t forget to add your seam allowance)
Fold the sleeve in on itself (along it’s seam line) so you can follow and trace where the sleeve attaches to the garment.

At this point you should have traced onto your freezer paper the right side of the shirt minus the sleeve.
Now you need to measure horizontally the store bought shirt across the hem at the bottom, and from armpit to armpit.
Use these measurements and divided by 2, place marks on the pattern at the measurements you came up with at the same locations they were taken. This is going to create the fold line for the fabric and give you what appears to be half a patten, or it will look like the shirt is folded in half.
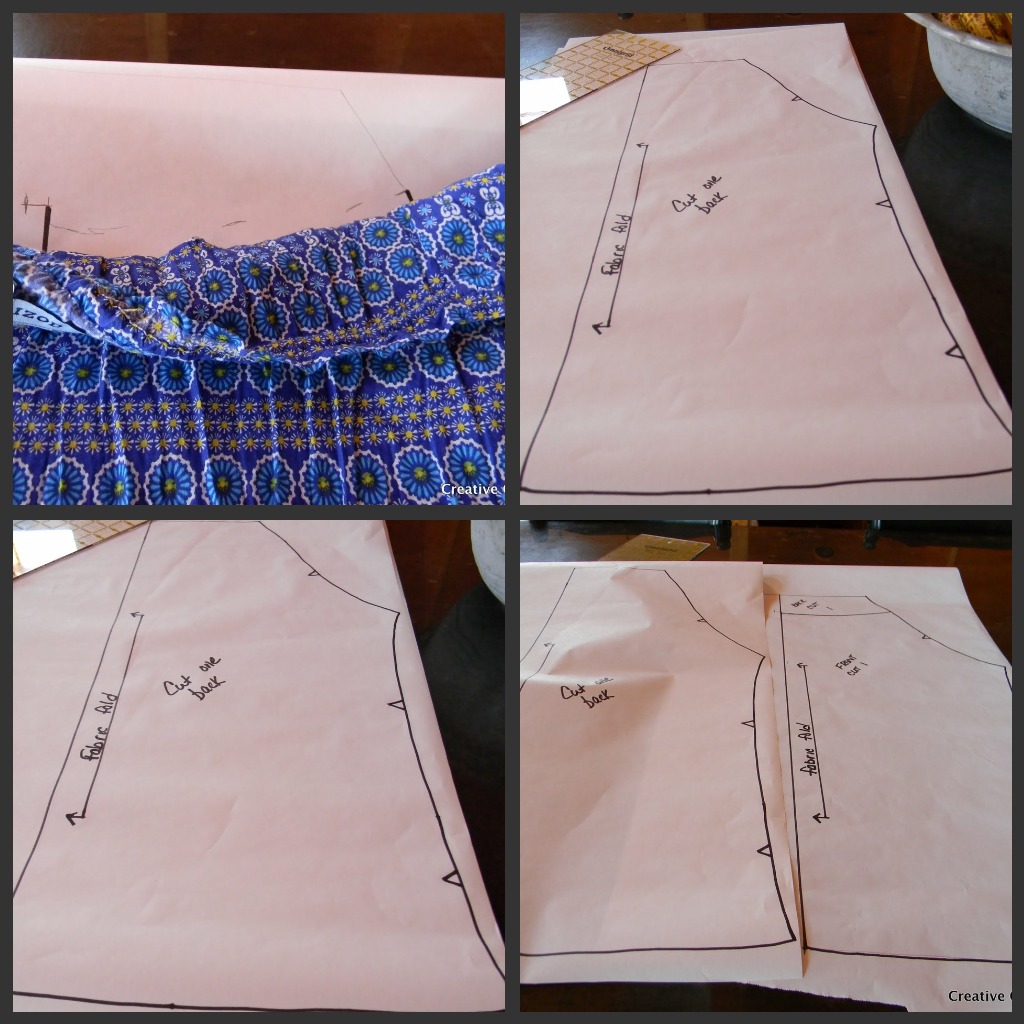
Now trace the neckline onto the pattern, if the neckline is lower in the front than in the back you will need to fold the back down onto the front, so you are able to trace it. You will create 2 pattern pieces at this point one with the back neckline traced and one with the front neckline traced. As in the bottom 2 photos. (The easiest way is to outline one with a marker, place the second piece of freezer paper on top and make a duplicate, then cut one with a lower neckline for the front. From the photo you can see where I have drawn the cut line to be shorter on the far right side, bottom photo)
Now use a straight edge and match all the points you measure to create the straight line where your fabric will be folded. (This will create one front and one back)

Now to create your sleeve pattern piece. You will make one pattern, but cut 2 sleeves.
First onto a new piece of freezer paper trace the curve of the arm hole from the existing pattern piece you have already created. (As in the bottom 2 photos).
Measure the distance from under the arm to the finished edge of the sleeve adding the seam allowance and draw onto the pattern. (This is the small line where my hand is placed in the photo)
Trace from the shoulder to the sleeve opening add your seam allowance. (As in the first photo)
Now connect the traced shoulder seam and the armpit seam to give you where your finished armhole opening will be.
Cut out the 3 pattern pieces.
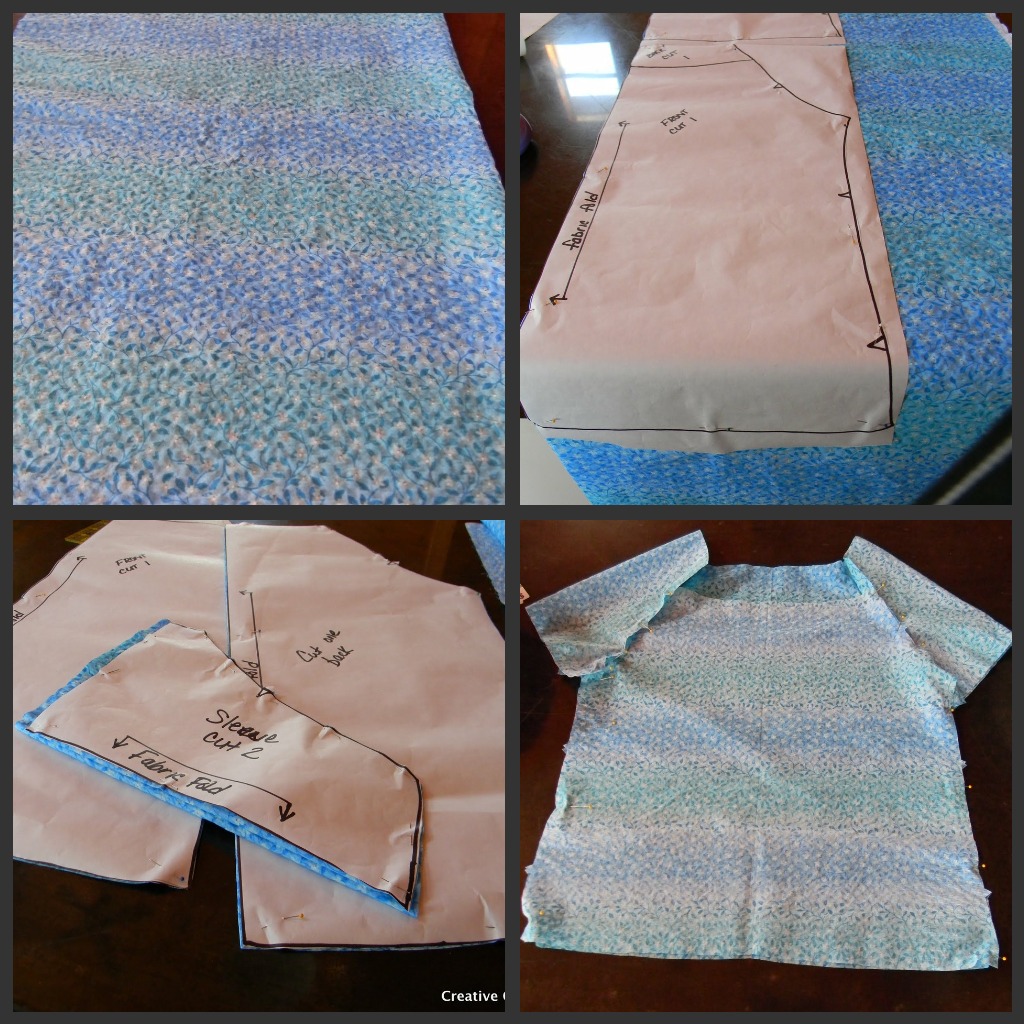
Fold fabric right sides together, place pattern on fabric, and cut out one front, one back, and 2 sleeves.
Pin together.

When everything is pined together, you will have to cut the small sections out on the front side to make the pattern neckline match up from front to back. (Top left photo.) Once you have it pined together you can see where the excess material is.
Serge all seams together, hemline, armholes, and neck hole.
Turn the bottom opening under and hem with a straight stitch.

Turn arm holes under, using a zigzag stitch, sew your cord elastic into the seam. Stretch the elastic as you sew, this will allow the arm hole to gather, and your hem and elastic will be done in one step.
Do the same for the neck hole.

Project Complete!
This is my first attempt at trying to tell someone how to make a pattern. If there is something that you don’t understand, please me and I will try to clarify it.
Linking up with
Debbie Doos
Dittle Dattle
Between Naps on the Porch
Girl Creative
DIYHSHP
DIY Show Off
Domestically Speaking
Be Colorful
Sew Happy Geek
Marvelously Messy
Sassy Sites
Tattered Tag
Not Just a House Wife
Savvy Southern Style
Elements Interiors
Boufee Bambini
Shabby Chic Cottage
Paisley Passions
HOH
Allie Makes
Born Again Crafter
Not Just a House Wife
Savvy Southern Style
Elements Interiors
Boufee Bambini
Shabby Chic Cottage
Paisley Passions
HOH
Allie Makes
Born Again Crafter


Adorable! I love the cut and color too. Thanks for joining the newbie party.
I became a follower and bookmarked this post because I think I can do this. Thanks so much.
That is fabulous. Thank you for linking up to More The Merrier.
Love It! Thanks for the great tutorial!
Thank you for posting this! You make it look easy! Jeannette M. pinkscrapz@gmail.com
SO very cute Dawn. I think maybe even I could do this and I am NO good with sewing but you made it seem so easy.
Stopped by from Debbiedoos. Hope you have a wonderful day 🙂
hiya visiting from debbis newbie party x this is a great tutorial really cute x have to give it a try x tfs hope to see youat mine soon x
xmaggie
I am a new follower! YEAY!!! Hope you will stop by my blog and follow back!
Sincerely,
Emma Michaels
Emma_Michaels@hotmail.com
http://EmmaMichaels.Blogspot.com
You are Sew Talented! I invite you to link to my great blog bash K.I.S.S. Happy to be a new follower too 🙂
Drop by The Tattered Tag
Super cute top. Wish I could wear those, & I’ve tried them on numerous times. Problem is, I always looks like a more than middle-aged pregnant lady & not in any kind of cute way. LOL!!! I’m a follower & hope you might follow back.
CAS
This is darling! I wish i wasn’t so afraid of my sewing machine.
Stopping by via Debbiedoos Blog. I love love love the idea of a newbie blog hop, so fantastic.
I wanted to make sure to come and give you a very warm welcome to the blogsphere and let you know we are having lots of fun over on my blog and you are invited!
There are so many FUN things happening over on Dandelion Wishes!!!
We are …..
*Taking Back Monday, one Etsy giveaway at a time. Come enter to win something awesome EVERY Monday!
*Airing our dirty little secrets with Friday Confessional. Confess, link up, feel better…I promise!
*Keeping it positive every weekend with My Happy List. What’s on YOUR Happy List this week? Post and link up…its a party y’all!
*Every month we give a prompt for a VLOG..yep, turn the volume up, we are talking video posts people!
*And there are crownings happening for Queen for the Day…finally, the royal recognition you deserve.
See something for everyone…come say hello!
This is gorgeous! Thank you for sharing and linking up to the handmade hog.
xoxo Hanna
Those are so cute, but I am not a sewer. Thanks for joining WUW.
I wish I knew how to create stuff like that. I have a sewing machine and can’t even get it to work right, hahaha.
Blog hopping! I’m your new follower and would love a follow back! http://www.adeliciousobsession.com Thanks!
Thank you SO MUCH for linking up to WHASSUP WEDNESDAY!!! Great entry:)
Hope to see you next Wednesday!
xoxokara
Looks very light and comfortable, just in time for summer! Four more months should be about right;)
-Bethanie
You make it all look so easy but I know better!! 🙂 Thank you for linking up to my K.I.S.S. blog bash last week. This weeks blog bash is in full swing again!! If you haven’t already please be sure & link up more of your creativity, I look forward to seeing all your great ideas. 🙂
Drop by The Tattered Tag
That’s amazing that you trasformed that to a beautiful top!
And thank you for linking up to thrifty thursdays!
Oh from the way, these kettlebells, though you may perhaps not have ever heard of these before, can
be uncovered right online.
My web page … http://www.getfitnstrong.com/adjustable-dumbbells/weight-sets-sale/
Bowflex has certainly been a chief in property training equipment.
Here is my blog dumbbell sets
There is a wide array of whole gym physical exercises that trainees, despite their practical experience, can
adopt and integrate into their education strategy.
my blog post … getfitnstrong.com
Bowflex total fitness center systems are reduced inertia resistance equipment.
Feel free to visit my website :: best adjustable dumbbells
Most importantly, for those who are a busy person, you will be in
all probability just far too busy to visit the health club.
Also visit my web page – bowflex adjustable dumbbells
You should also talk to your self the place you happen to
be about to keep your house health club devices.
Here is my site; http://www.getfitnstrong.com