DIY Tounge and Groove Floor Board Replacement


 My Hubby’s to do list continues…..We have 4 boards in our homes flooring that have cracks in them, so I talked hubby into doing an experiment for a quick and inexpensive fix. Oh and yes I got the look, you know the one that says “why do you always have to come up with your so called brilliant idea?” Thankfully he goes along with all my hair brained ideas and chips in to do the work. The broken board that bugs me the most is the one directly behind the bar stools in a high traffic area.
Tongue and groove floors move and contract depending on how warm or cold it is. Apparently one of the kids leaned the bar stool up on two legs and the seam between the boards was open just enough that it cracked from direct pressure (the small portion you can see in the photo above). The piece has stayed in place for years but just recently I caught my sock on it and it pulled up the broken section. I’m so glad I was wearing socks or that could have been one very large sliver.
 So here’s where my brilliant idea comes in. I said to hubby why don’t we just cut that board out, stain a new one and face nail it in place? At this point there’s no way to add another tongue and groove board unless we start at one wall and tear it back to the affected area. Well to me that sounds ridiculous, if we go to that much work we may as well replace the floors. Must be hubby was reading my mind, he said I’ll just call my brother (who lives in NY and owns a flooring store) and order new floors. Of course we would get them at his cost and he would have them shipped right from the factory to our house but I still wasn’t all for it.
 I thought about it for a few days and suggested we just try and remove one board and see how my idea works. If it turns out, we can replace the other 3 boards for under $10 and a lot less work. I so hate to purchase new floors until we are pet free. All the damage to the existing floors is mostly from the dog and I don’t want to invest thousands of dollars just to have them beat up, so we decided we would live with what we have until the pet free time arrives.
 While hubby was working I noticed the blob of dog hair under the floorboard. How in the world could it get under there? All the more reason to wait on floor replacement. I couldn’t wait to get my vacuum cleaner out and suck up that hair ball. For those of you who don’t know….I have a vacuum obsession. I vacuum several times a day just because I hate pet hair floating around. I vacuum every level, every day, several times a day.
 Once I got that mess cleaned up I stained new floor boards. We had our floor custom cut so we couldn’t purchase boards in the same size. We went bigger and hubby cut the width to match exactly what we needed. Come back on Friday to see how it looks. So here’s what we did:
 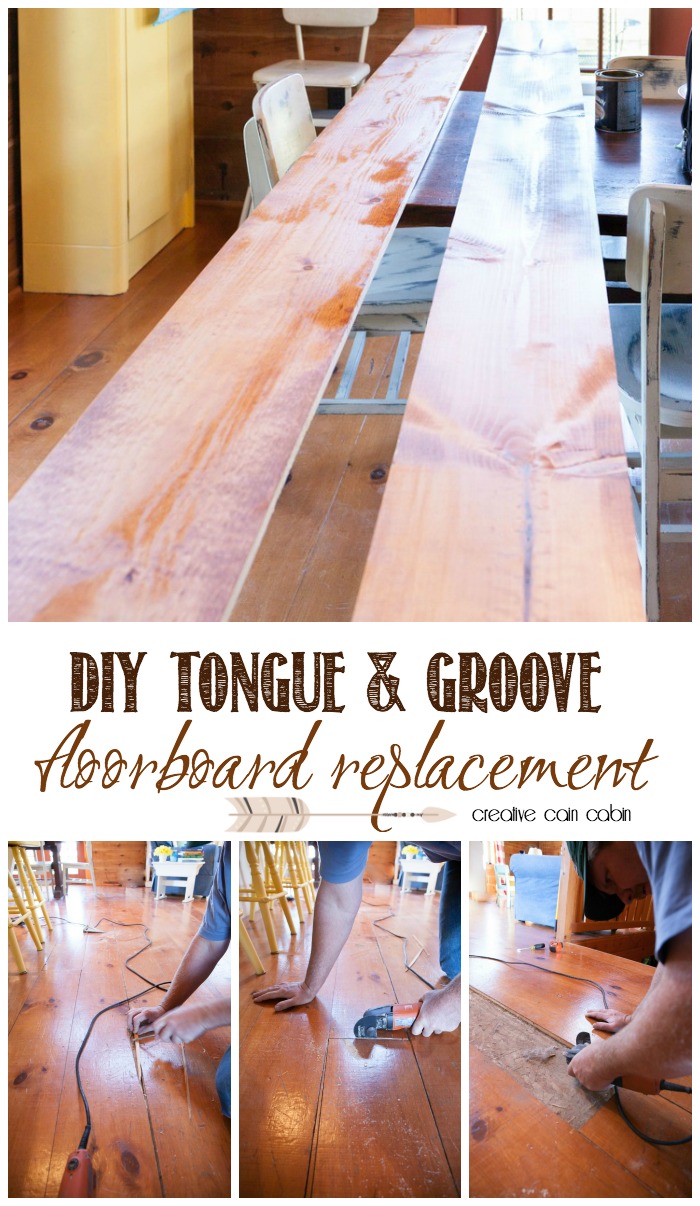 1. Pull any broken and loose sections of the board out.
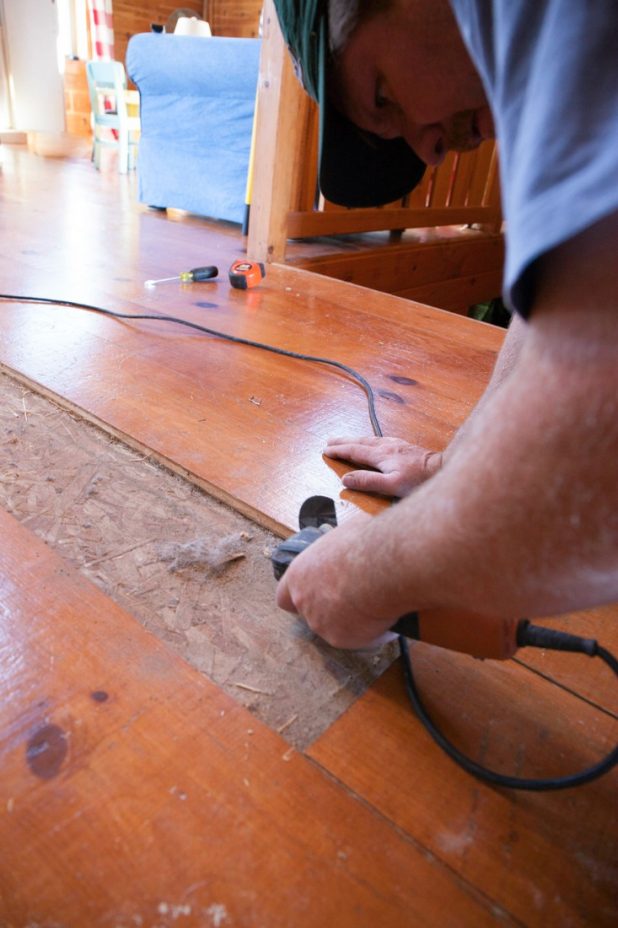
2. Use a RotoZip or Dremel and cut through the tongue of the board.
3. Carefully pry the section of board out using a screwdriver and a piece of wood behind it so you don’t mar the surrounding boards.
4. Vacuum subfloor
5. Replace with a new board
6. Face Nail
7. Apply floor sealer to the new board.


What a smart idea Dawn! Besides pet wear, living in the country make it more challenging with wood floors? Imagine if you had carpet. Kathleen in Az
Kathleen shoes are always on and that’s the way I wanted it. I didn’t want people to feel like they had to take them off. Carpet would be a nightmare with all the pet hair.
Looks good, Dawn! Our wood floors are a mess because of our dogs, too.
Claudia that’s exactly why I will wait to replace them. I don’t want to do the work twice or go to the expense.
What….you vacuum several times a day…..Oh my!!! We have original hardwood floors in our 1950 rancher and I clean them once a week….But…we do not have any animals!!!
Jeanie, yep several times a day. If I see anything on the floor I vacuum the whole level. My hubby and son say I’m obsessed with the vacuum (maybe they’re right)
Great solution!…Love your floors….
Thank you Shirley it was definitely the easiest and cheapest solution.
Dawn, what a excellent idea. I bet it looks great and you saved a bundle ! I like your way of thinking.
Cheryl Im sharing the photos on Sunday and you can’t even tell where we did it. I’m so happy with the results.
What a big savings Dawn…
Nancy I was thrilled we didn’t have to do a total floor replacement. This will work great for now.
Can’t imagine vacuuming several times a day. The dog hair is nothing compared to what comes inside on people’s shoes and outdoor clothing. I also can’t imagine wanting to be pet-free, as I’ve had either a dog or cat in my home since childhood and would miss their presence and unconditional love. We all have our particular quirks and obsessions – mine is organization. Every closet, cabinet and drawer in my home is near perfection – but I have dog hair on the floor between vacuumings. 🙂